The Perfect Dry-Aged Duck at Home
- 2 days ago
- 4 min read
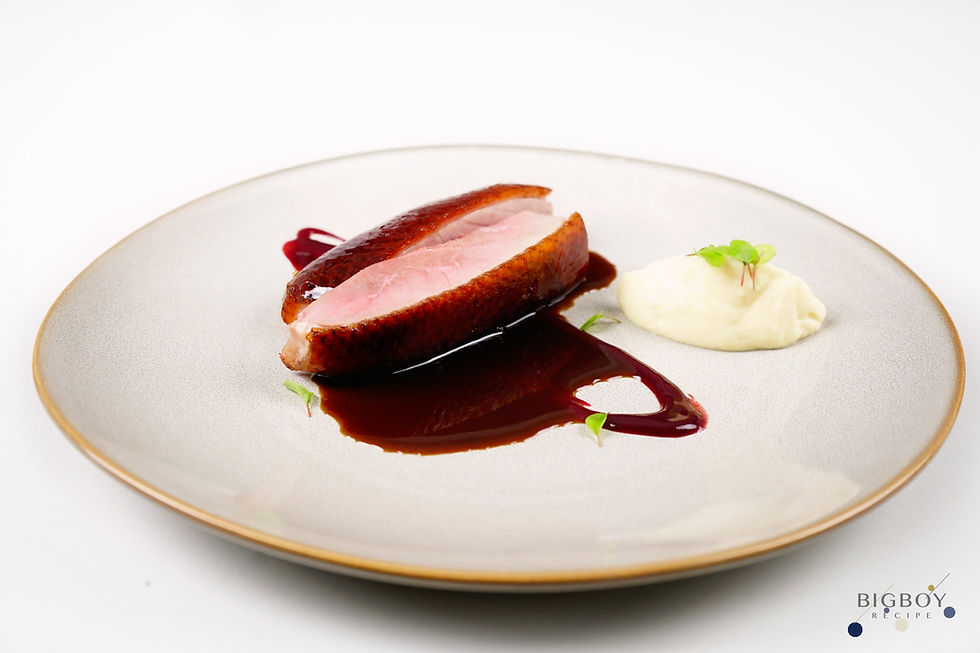
In Western cuisine, Dry Aging is one of the premium techniques for enhancing the flavour of meat. In recent years, many food enthusiasts have been raving about dry-aged beef, yet few are aware that duck is also exceptionally well-suited for dry aging. After 14 days of careful aging, the duck skin becomes exceptionally crispy, the meat is tender and juicy, and the duck flavor is rich with impressive depth and complexity.

What is Dry Aging?
Dry aging refers to the process of placing a whole bird or large cuts of meat in a low-temperature environment with controlled humidity and good air circulation, allowing it to air-dry naturally over a period of time. During this process, moisture on the surface of the meat slowly evaporates, while natural enzymes inside the meat gradually break down muscle fibers and connective tissues.
Unlike wet aging (Wet Aging), which uses vacuum packaging, dry aging exposes the meat directly to a controlled environment. This allows it to achieve two effects simultaneously: drying the outer skin and enzymatic tenderization. Because duck has a relatively thick layer of fat that protects the meat underneath, it is one of the ideal ingredients for dry aging.

Why Dry Age?
Dry aging brings three major advantages:
Crispy Skin and Tender Meat: The loss of moisture makes the duck skin dry and firm. During roasting, the rendered fat essentially fries the skin, turning it golden and ultra-crispy. At the same time, natural enzymes break down the connective tissues, resulting in exceptionally tender and silky meat.
Rich Flavour: The aging process reduces moisture content, concentrating the natural meat flavours. It also develops complex nutty and earthy aromas, creating a depth of flavour far superior to that of fresh duck.
Elevated Quality: After 14 days of aging, both the texture and aroma of the duck are significantly enhanced. Even when prepared with simple home cooking methods, it can reach restaurant-grade standards.

What Equipment Do You Need to Make Dry-Aged Duck at Home?
The good news is that dry-aged duck does not require expensive professional aging cabinets — a regular household refrigerator is sufficient. The main equipment and tools needed are:
Household refrigerator (set to approximately 2–4°C)
Metal roasting rack + drip tray (to catch blood and moisture)
Clean container (for brining)
Basic ingredients: salt, herbs, maltose, and white vinegar
As long as the refrigerator has enough space, is clean and hygienic, and maintains good air circulation, you can successfully carry out dry aging.

Key Tips for Dry-Aged Duck
To successfully make dry-aged duck at home, the following points are essential:
Pre-treatment: First, brine the duck in a 5% herb-infused salt solution for 5 hours. This not only seasons the meat lightly but also helps it retain moisture. Afterwards, repeatedly dip the duck in hot water to kill surface bacteria, then coat it with a maltose glaze to promote better colouring.
Aging Time and Environment: It is recommended to age the duck in the refrigerator for a full 14 days. Check the smell and texture daily or every other day to ensure there is no off odor or slime. The first 7 days focus mainly on moisture loss, while the latter 7 days develop deeper flavour.
Hygiene First: The refrigerator must be thoroughly cleaned and disinfected. Raw meat should be placed on the lower shelves to avoid cross-contamination. Placing a bowl of water inside during aging can help maintain suitable humidity.
Roasting Technique: After aging is complete, let the duck come to room temperature for about 30 minutes. Roast at 190°C for approximately 23–25 minutes, rotating the duck occasionally for even heating. After removing from the oven, rest the duck for 15–20 minutes before slicing. This allows the juices to redistribute evenly.
Although dry-aged duck requires 14 days of patient waiting, the process is not complicated, and the results are truly impressive. Once you master the correct steps, you can create a high-end dish with crispy skin, tender meat, and exceptional flavor right in your own kitchen. Next time you want to challenge yourself with Western fine dining at home, give this dry-aged duck a try — it will surely add a delightful surprise and satisfaction to your dining table.
Watch the full video below! Scroll down for the detailed written recipe and instructions.
Ingredients
Steps
1.
Place water, salt and herbs in a pot. Heat until salt dissolved. Set aside to cool.
2.
Portion the duck according to the instructions in the video. Then Brine the duck in the 5% salt water for 5 hours.
3.
After brining, blanch the duck in hot water for a few times until the skin shrinks. Take out the feather.
4.
Heat Maltose, Red Wine Vinegar and water until maltose dissolved (vinegar maltose water 1:2:6 ratio). Brush maltose water onto the duck skin evenly.
5.
Put the duck on a rack, dry in the fridge.
6.
On the second day, brush again the maltose glaze onto the duck skin. Send it back to the fridge and dry-aging for another 13 days.
7.
After 14 days, take out the duck. Leave it at room temperature for half an hour.
8.
Oven preheat to 190°C.
9.
Roast for 23-24 minutes, every 5-6 mins turn the duck around 90 degrees. Roast until internal temp reaches 45°C.
10.
Rest for 15 mins and carve.


Comments